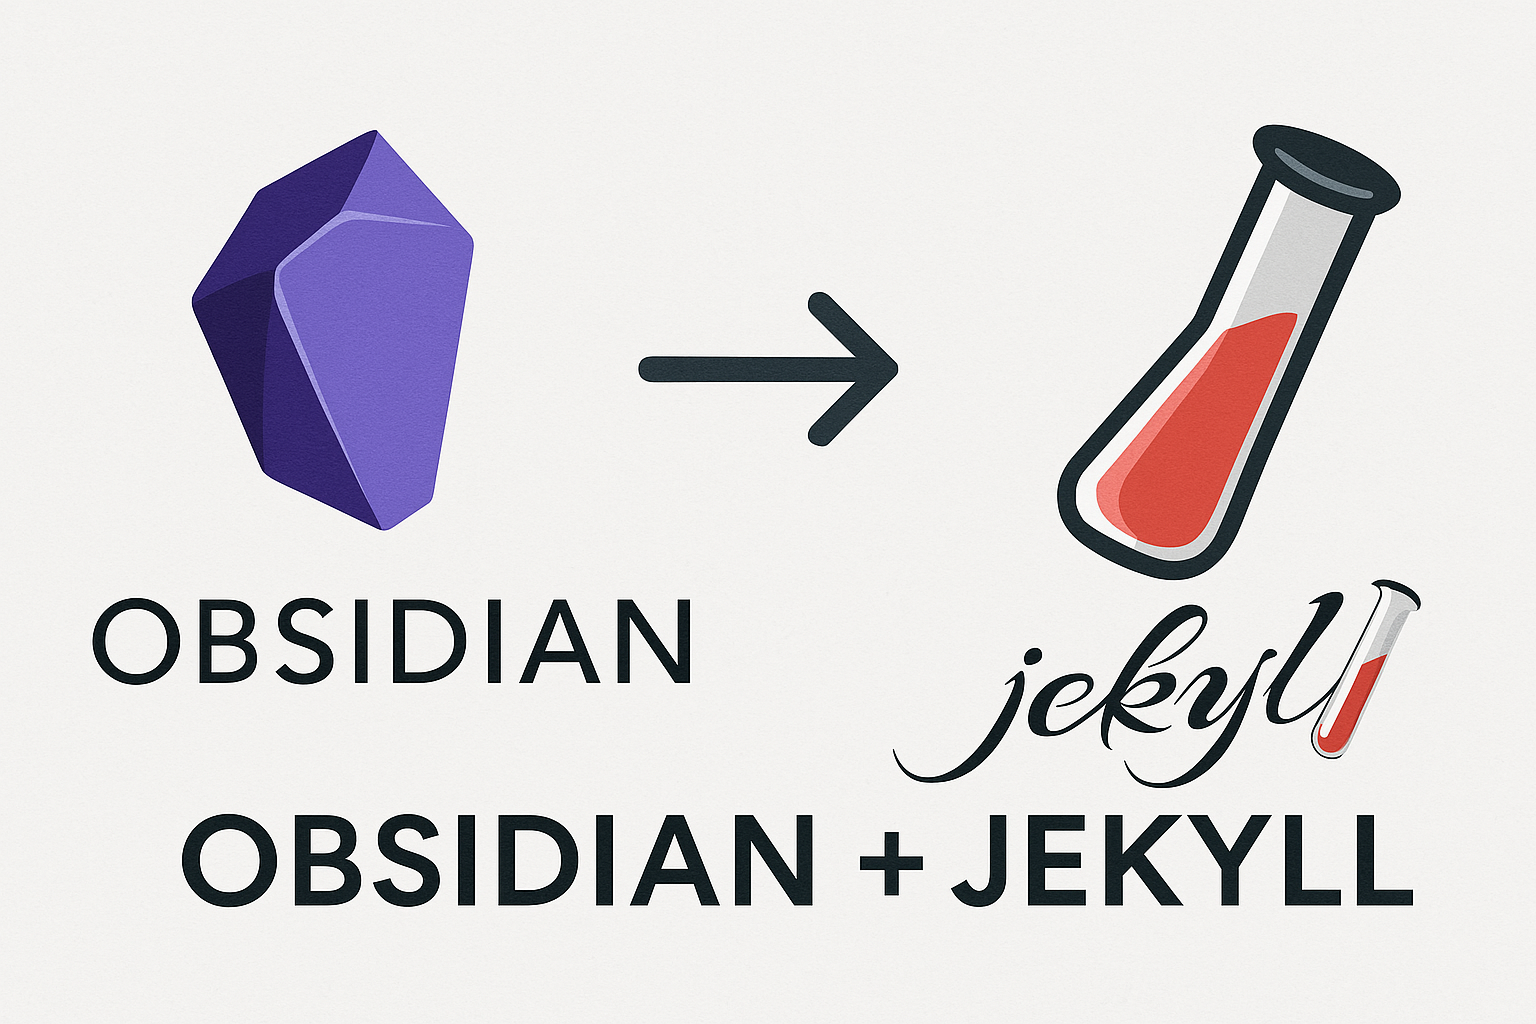
My Blogging Setup
My blogging setup, aka how to create a blog with Obsidian and Chirpy (Jekyll theme)
Though I use Jekyll, this should technically work with any blogging framework. This tutorial assumes that you are familiar with Jekyll, GitHub Pages, etc.
Requirements
- Public GitHub repository for your blog (e.g. my blog’s repository)
- Jekyll
- Obsidian
- Enveloppe plugin (GitHub repository)
- (OPTIONAL) Obsidian app (iPhone OR Android)
- (OPTIONAL) Giscus app
Setup
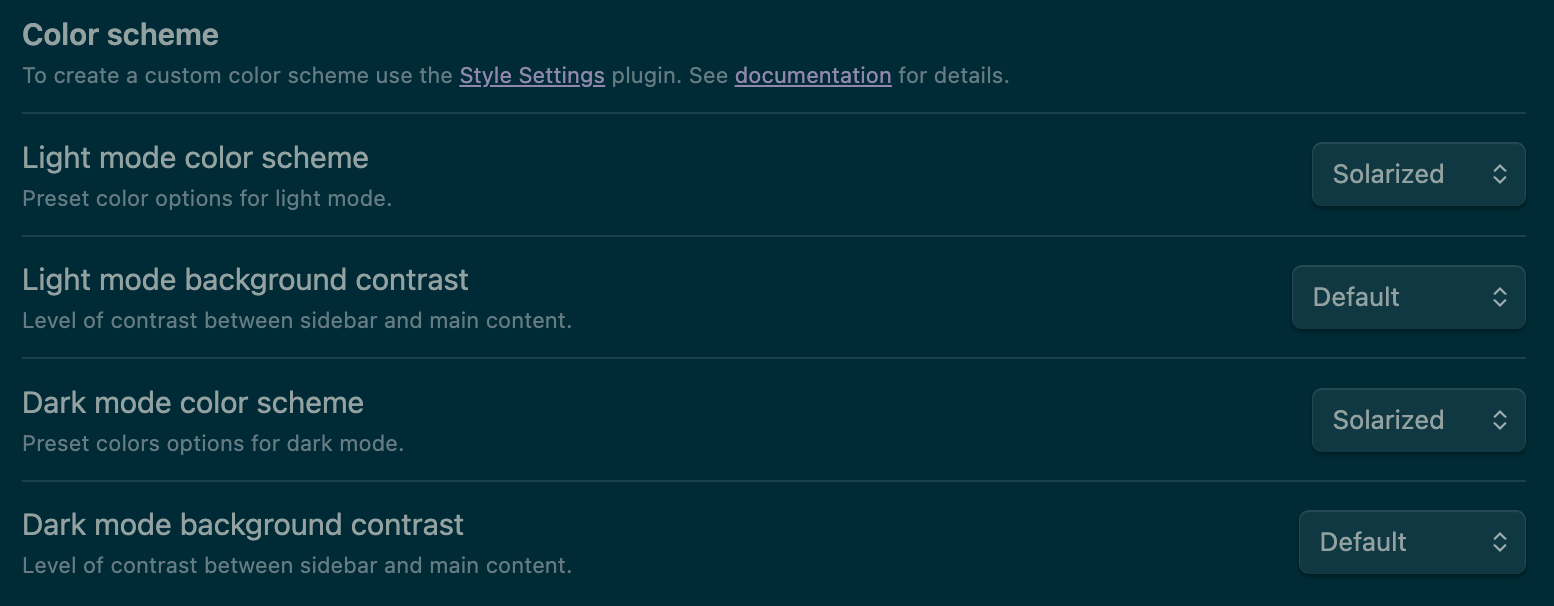
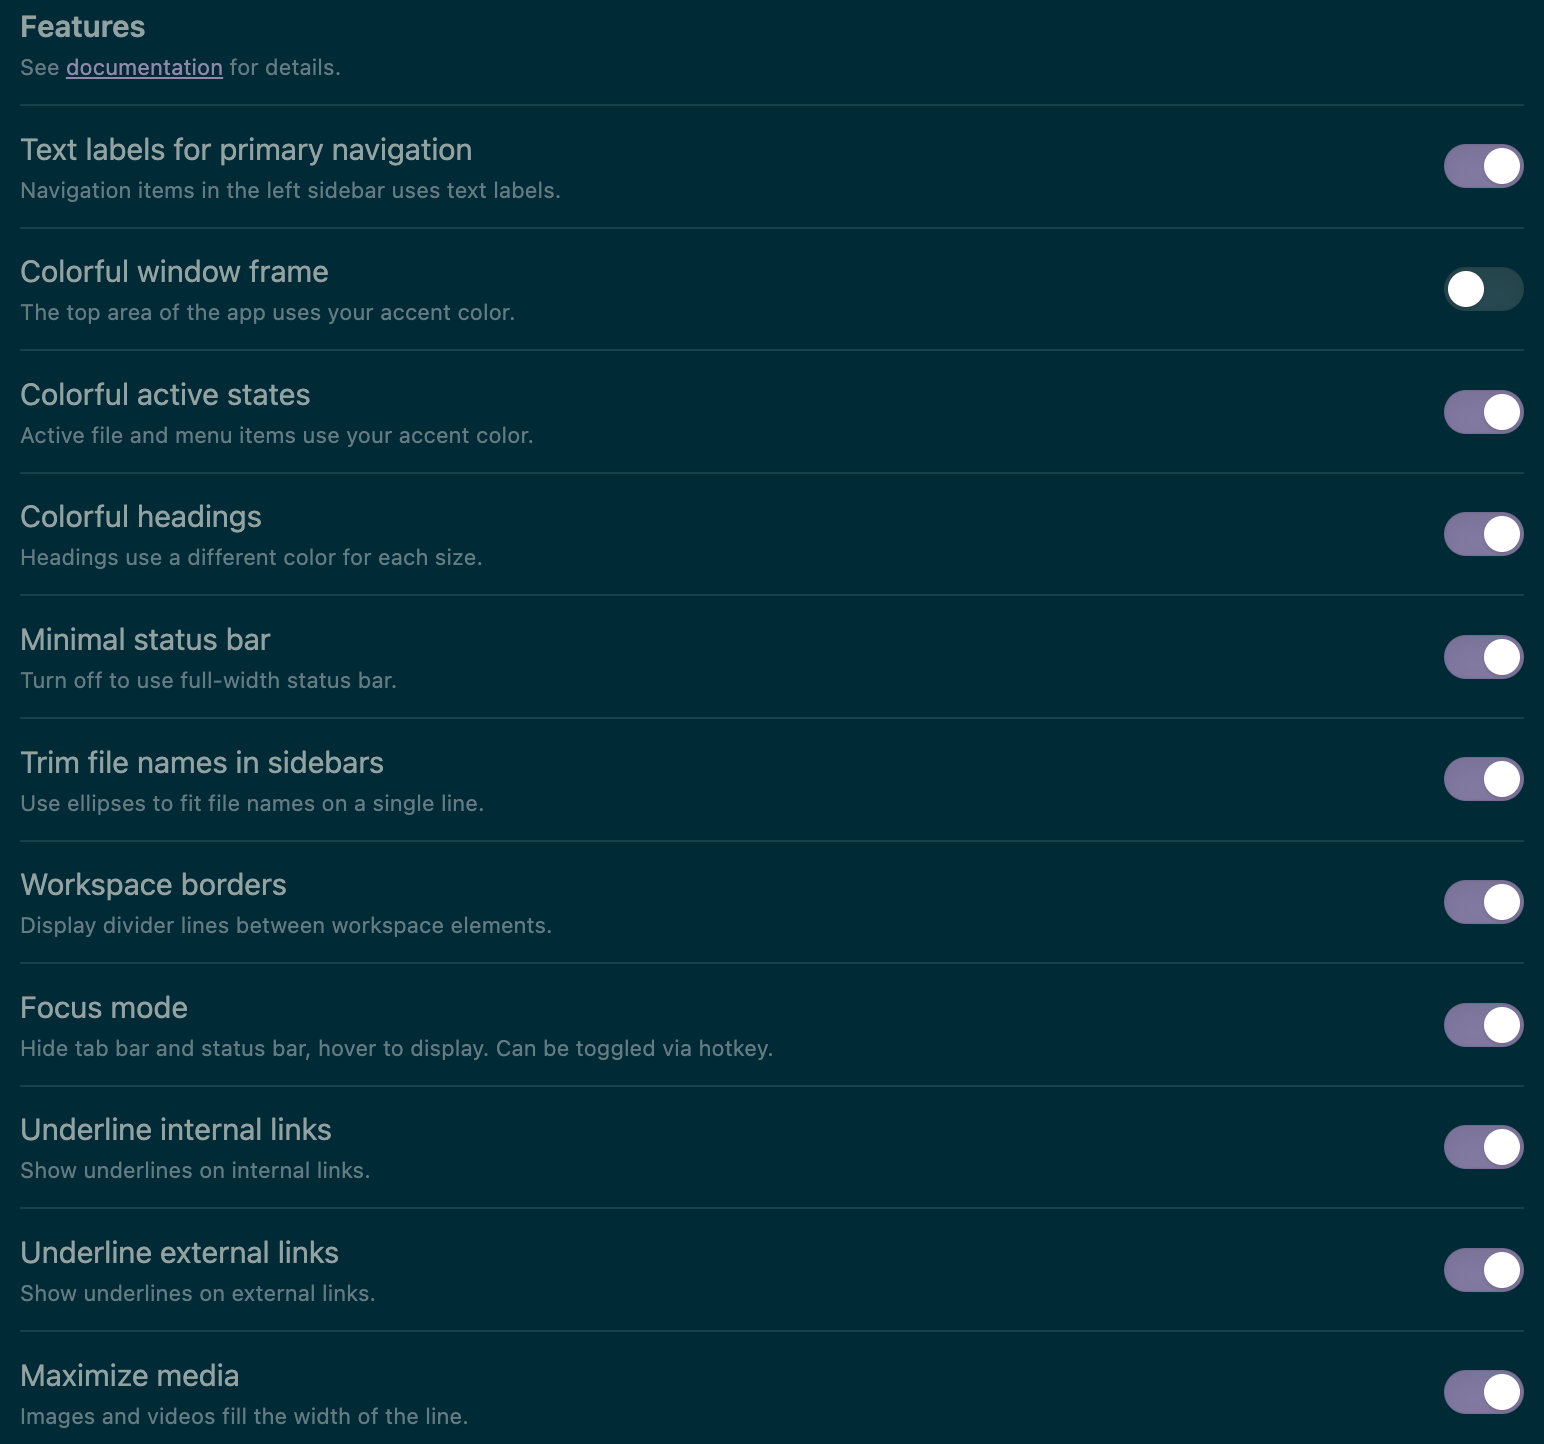
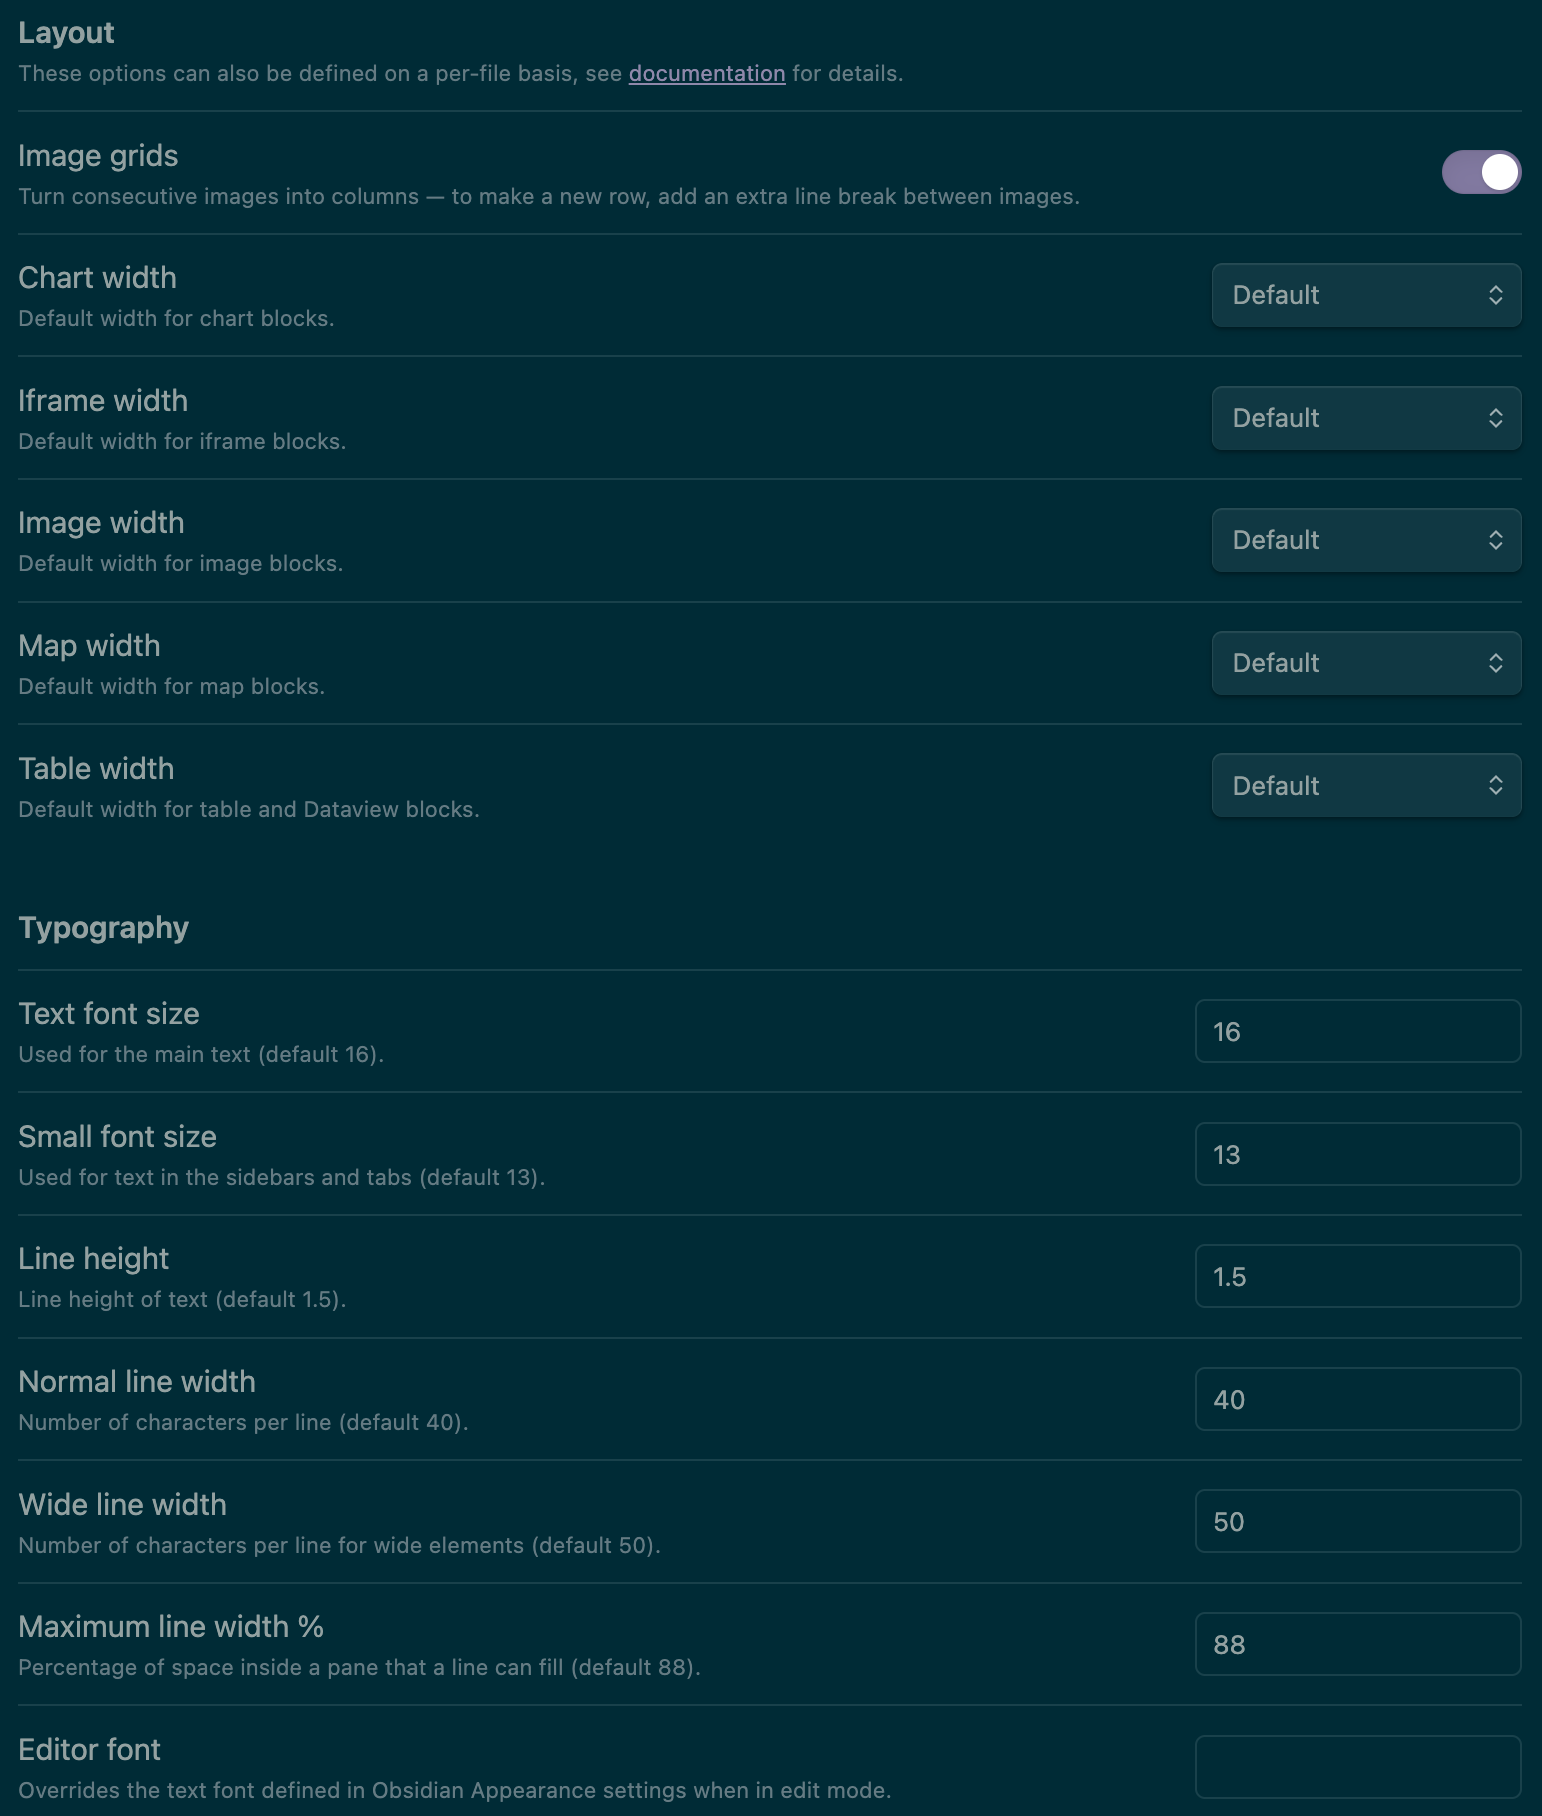
Obsidian Theme
I’ve always been a fan of dark mode color scheme, especially solarized dark. I also prefer to avoid cluttered UI, which is why I use the Minimal Theme Settings plugin.
Open Settings (Command ⌘ + ,) in Obsidian
- Go to Community plugins tab
If it isn’t already, turn off Restricted mode to enable community plugins
Click Browse, which is next to Community plugins
Enter
Minimal Theme Settingsin the searchbarClick on Minimal Theme Settings, then click Install
Once it’s installed, go to Appearance tab
Next to Themes, select Minimal to apply the theme
Go to Minimal Theme Settings tab
Modify the settings to your liking
Here are mine, for reference:
Obsidian Mobile App
I use Obsidian’s iPhone app with iCloud, which I’ll walk through in this section, though Obsidian also offers Obsidian Sync as an alternative. If you don’t have an Apple device, iCloud isn’t applicable.
Once the Obsidian app is downloaded, check your iCloud Drive: There should be an
Obsidianfolder; if not, make oneMove all your vaults (i.e. directories) to
Obsidianfolder. E.g. my vault is namedWriting, with path ofiCloud Drive/Obsidian/Writing/(which, in my case, points to$HOME/Library/Mobile Documents/iCloud~md~obsidian/Documents/Writing/)
Setup Enveloppe
Launch Obsidian
Open Settings (Command ⌘ + ,)
Go to Community plugins tab
Turn off Restricted mode to enable community plugins
Click Browse, which is next to Community plugins
Enter
Enveloppein the searchbarClick on Enveloppe, then click Install
Once Enveloppe’s installed, go to its settings (i.e. under Community plugins section in the settings sidebar, click Enveloppe)
Copy my Enveloppe settings
1
2
3
4
5
6
7
8
9
10
11
12
13
14
15
16
17
18
19
20
21
22
23
24
25
26
27
28
29
30
31
32
33
34
35
36
37
38
39
40
41
42
43
44
45
46
47
48
49
50
51
52
53
54
55
56
57
58
59
60
61
62
63
64
65
66
67
68
69
70
71
72
73
74
75
76
77
78
79
80
81
82
83
84
85
86
87
88
89
90
91
92
93
94
95
96
97
98
99
100
101
 {
   "github": {
     "branch": "main",
     "automaticallyMergePR": true,
     "dryRun": {
       "enable": false,
       "folderName": "enveloppe"
     },
     "api": {
       "tiersForApi": "Github Free/Pro/Team (default)",
       "hostname": ""
     },
     "workflow": {
       "commitMessage": "[OBSIDIAN] Merge",
       "name": ""
     },
     "verifiedRepo": true
   },
   "upload": {
     "behavior": "fixed",
     "defaultName": "_posts",
     "rootFolder": "",
     "yamlFolderKey": "",
     "frontmatterTitle": {
       "enable": true,
       "key": "filename"
     },
     "replaceTitle": [
       {
         "regex": "/\\s+/",
         "replacement": "-",
         "type": "title"
       }
     ],
     "replacePath": [],
     "autoclean": {
       "includeAttachments": true,
       "enable": false,
       "excluded": []
     },
     "folderNote": {
       "enable": false,
       "rename": "index.md",
       "addTitle": {
         "enable": false,
         "key": "title"
       }
     },
     "metadataExtractorPath": ""
   },
   "conversion": {
     "hardbreak": false,
     "dataview": true,
     "censorText": [],
     "tags": {
       "inline": false,
       "exclude": [],
       "fields": []
     },
     "links": {
       "internal": true,
       "unshared": true,
       "wiki": true,
       "slugify": "strict",
       "unlink": true,
       "relativePath": true,
       "textPrefix": "/"
     }
   },
   "embed": {
     "attachments": true,
     "overrideAttachments": [],
     "keySendFile": [],
     "notes": false,
     "folder": "assets/img/obsidian",
     "convertEmbedToLinks": "keep",
     "charConvert": "->",
     "unHandledObsidianExt": [],
     "sendSimpleLinks": true,
     "forcePush": true,
     "useObsidianFolder": false
   },
   "plugin": {
     "shareKey": "share",
     "excludedFolder": [
       "templates"
     ],
     "copyLink": {
       "enable": false,
       "links": "",
       "removePart": [],
       "addCmd": false,
       "transform": {
         "toUri": true,
         "slugify": "lower",
         "applyRegex": []
       }
     },
     "setFrontmatterKey": "Set"
   }
 }
Click Import settings and paste the copied
enveloppe.json(from the previous step) where it saysPaste configuration here..., then click SaveUnder GitHub config, enter your GitHub username, Repository name, and — if your main branch is not named
main— Main branch nameGenerate a fine-grained personal access token for your GitHub repository in order to give Enveloppe necessary permissions to work by going to your GitHub settings
Scroll down and click Developer settings
Click Personal access tokens, click Fine-grained tokens, then click Generate new token
Enter a descriptive Token name (e.g.
Enveloppe (Obsidian)) and Description (e.g.Enveloppe (Obsidian Vault → GitHub Repo))Choose your GitHub account as Resource owner
Select No expiration for Expiration
Under Repository access, click Only select repositories then click Select repositories and select the GitHub repository for your Jekyll blog (e.g.
lynkos/blog)Click Repository permissions under Permissions
Always choose the minimal permissions necessary, so all options should be set to Access: No access, with the exception of the following:
Permission Access Reason Contents Read and write Create branch Metadata Read-only Mandatory Pull requests Read and write Create and merge pull requests Workflows Read and write Create/update file Click Generate token
Copy the generated GitHub personal access token; it should start with
github_followed by a long, random string of alphanumeric characters and underscoresBack in Enveloppe settings, paste it in the GitHub token area
Setup Comments
If you haven’t already, make your blog’s GitHub repository public
Go to your GitHub repository’s settings (i.e.
https://github.com/GITHUB_USERNAME/REPO/settings), scroll down to Features and enable the Discussions featureGo to the Discussions tab (i.e.
https://github.com/GITHUB_USERNAME/REPO/discussions), then click the pencil icon next to Categories- Edit the default
Announcementscategory:- Category name:
Comments - Category icon: 💬
- Description:
Comments on posts - Discussion Format:
Announcement
- Category name:
Click Save changes
(OPTIONAL) Delete all other default categories, if you don’t need it, by clicking the trash icon next to the category name
Install the Giscus app on GitHub
Go to Giscus and fill out the form
Copy the auto-generated
<script>under Enable giscusExample code with my configuration:
1
2
3
4
5
6
7
8
9
10
11
12
13
14
15
 <script src="https://giscus.app/client.js"
     data-repo="<GITHUB_USERNAME>/<REPO>"
     data-repo-id="<REPO_ID>"
     data-category="Comments"
     data-category-id="<CATEGORY_ID>"
     data-mapping="pathname"
     data-strict="0"
     data-reactions-enabled="1"
     data-emit-metadata="0"
     data-input-position="top"
     data-lang="en"
     data-loading="lazy"
     crossorigin="anonymous"
     async>
 </script>
- Add the
<script>tag- If you’re NOT using
jekyll-theme-chirpy, to your website’s template where you want the comments to appear (Note: If an element with thegiscusclass exists, the comments will be placed there instead) - If you ARE using the Jekyll theme Chirpy, continue to the next section
- If you’re NOT using
OPTIONAL: ADD COMMENTS FEATURE TO jekyll-theme-chirpy
Go to
_config.ymlin your repositoryFind the
commentssectionSet
providertogiscusFill in all options under
giscuswith the values from the<script>you copied in Step #5Example code with my configuration for
commentssection:1 2 3 4 5 6 7 8 9 10 11 12 13 14 15 16 17 18 19 20 21 22
comments: # Global switch for the post-comment system. Keeping it empty means disabled. provider: giscus # [disqus | utterances | giscus] # The provider options are as follows: disqus: shortname: # fill with the Disqus shortname. › https://help.disqus.com/en/articles/1717111-what-s-a-shortname # utterances settings › https://utteranc.es/ utterances: repo: # <gh-username>/<repo> issue_term: # < url | pathname | title | ...> # Giscus options › https://giscus.app giscus: repo: <GITHUB_USERNAME>/<REPO> repo_id: <REPO_ID> category: "Comments" category_id: <CATEGORY_ID> mapping: # optional, default to 'pathname' strict: # optional, default to '0' input_position: "top" # optional, default to 'bottom' lang: # optional, default to the value of `site.lang` loading: lazy # comments loading will be deferred till user scrolls near comments container reactions_enabled: # optional, default to the value of `1`
Setup Image Proxy
A custom Cloudflare Worker hotlinks images from sites that may restrict it; this way I can embed images from Twitter/X. Custom Ruby plugin _plugins/gallery.rb automatically prepends Twitter/X URLs within a gallery with the value of worker_base_url. Additional sites will be added as needed. This proxy currently only supports Twitter/X.
Sign up and/or login to Cloudflare
Go to your dashboard
In the left pane, click Compute (Workers), then Workers & Pages
Click the blue Create application button in the upper-right corner
In the Workers tab, click the blue Get Started button to the right of Start with Hello World!
Name the worker
img-proxyClick Deploy
You should be redirected to a page that says Success! Your project is deployed to Region: …
Click the Edit Code button; you can also access this page later by going to Compute (Workers) > Workers & Pages, clicking the worker (i.e.
img-proxy), then clicking the small icon </> in the upper-right cornerThis should open the Cloudflare Workers IDE; replace the default code in
worker.jswith the following code:1 2 3 4 5 6 7 8 9 10 11 12 13 14 15 16 17 18 19 20 21 22 23 24 25 26 27 28 29
export default { /** * @param request */ async fetch(request) { const url = new URL(request.url); const target = url.searchParams.get("url"); // i.e. ?url=https://pbs.twimg.com/media/... if (!target) { return new Response("Missing ?url= param", { status: 400 }); } try { const resp = await fetch(target, { headers: { "User-Agent": "Mozilla/5.0" } }); const headers = new Headers(resp.headers); headers.set("Access-Control-Allow-Origin", "*"); return new Response(await resp.arrayBuffer(), { status: resp.status, headers }); } catch (err) { return new Response("Fetch error: " + err.message, { status: 502 }); } } };
Test the worker in the Preview pane by adding
?url=and the link to an image on Twitter (e.g.https://pbs.twimg.com/media/GzPhoaKWoAA16uA?format=jpg&name=medium) following AFTER your worker’s URL (i.e.https://img-proxy.<YOUR_DOMAIN_NAME>.workers.dev/) in the input fieldSo, in this example, the full URL is:
https://img-proxy.<YOUR_DOMAIN_NAME>.workers.dev/?url=https://pbs.twimg.com/media/GzPhoaKWoAA16uA?format=jpg&name=mediumClick the Reload button (circular arrow icon) to the right of the input field to test it; if successful, you should see the image in the Preview pane
Click Deploy in the upper-right corner
You can now use this worker as an image proxy by using the following URL format, where
<YOUR_DOMAIN_NAME>is your Cloudflare domain (e.g.example.com) and<IMAGE_URL>is the full URL of the image you want to hotlink (e.g.https://pbs.twimg.com/media/GzPhoaKWoAA16uA?format=jpg&name=medium):1
https://img-proxy.<YOUR_DOMAIN_NAME>.workers.dev/?url=<IMAGE_URL>
OPTIONAL: USE CUSTOM DOMAIN (e.g. img-proxy.<YOUR_ROOT_DOMAIN>)
In the left pane, click DNS, then Records
- Click the blue + Add record button, then add a new record with the following details:
- Type:
CNAME - Name:
img-proxy(or whatever subdomain you want to use) - IPv4 address:
workers.dev - Proxy status:
Proxiedaka Enabled (orange cloud icon) - TTL:
Auto - Comment:
Map img-proxy worker (at img-proxy.<YOUR_DOMAIN_NAME>.workers.dev) to img-proxy.<YOUR_ROOT_DOMAIN>
- Type:
Click Save
Click Workers Routes in the left pane, then click the blue Add route button in the HTTP Routes section
In the Route field, enter
img-proxy.<YOUR_ROOT_DOMAIN>/*Under Worker, select
img-proxyworker (or whatever you named it) from the dropdownClick Save
- You can now use the custom domain for your image proxy at
https://img-proxy.<YOUR_ROOT_DOMAIN>/?url=<IMAGE_URL>(e.g.https://img-proxy.example.com/?url=https://pbs.twimg.com/media/GzPhoaKWoAA16uA?format=jpg&name=medium)
Create Hotkeys
Launch Obsidian
Save the template in Default Template to your vault (e.g.
templates/default.txt)Open Settings (Command ⌘ + ,)
Go to Hotkeys tab
Scroll to Templates: Insert template
Click the + icon (says Customize this command when you hover over it)
Press Command ⌘ + Shift ⇧ + T, or your preferred hotkey
Scroll to Enveloppe: Upload single current active note
Click the + icon (says Customize this command when you hover over it)
Press Command ⌘ + Shift ⇧ + P, or your preferred hotkey
Now we can automatically apply the template to any new post and auto-publish your Obsidian post to your blog with those hotkeys!
Make sure
share: trueis in the frontmatter, otherwise it won’t post
Writing Posts
Default Template
You’ll need to add the following to the top of every Markdown post you make
1
2
3
4
5
6
7
8
9
10
11
12
13
14
15
16
17
18
---
share: false
title: {{title}}
date: {{date:YYYY-MM-DD}} {{time:HH:mm:ss ZZ}}
filename: "{{date:YYYY-MM-DD}}-{{title}}"
description: Post summary.
math: false
mermaid: false
pin: false
toc: true
comments: true
categories: [top_category, sub_category]
tags: [tag]
image:
  path: /relative/path/to/image
  lqip: minified_image_encoded_in_base64
  alt: Image caption
---
| Key | Description |
|---|---|
share | When true, it will push to Github |
title | Post title |
date | Date and time created; format yyyy-mm-dd hh:mm:ss utc_offset |
filename | Where your file will be saved in Github; format yyyy-mm-dd-title-here |
description | Optional post description; will appear below post title and in previews |
math | When true, enables MathJax for LaTeX processing |
mermaid | When true, enables Mermaid for diagram rendering |
pin | When true, it will pin this post on website |
toc | When false, the table of contents is hidden |
comments | When false, the comments section is hidden |
categories | Optional list of categories; 1st element is main category, remaining elements are subcategories |
tags | Optional list of tags |
path | Optional path to preview image |
lqip | Optional preview image’s base64-encoded LQIP |
alt | Optional caption and alt text for preview image (can be left blank) |
Add Preview Image
To add a preview image to a post, make sure the following is in your Markdown file’s front matter
1
2
3
4
image:
  path: /path/to/image.png
  lqip: base64-encoded-lqip
  alt: Optional image caption and alt text
To generate a base64-encoded LQIP for the lqip field:
Visit lqip generator
Upload your preview image
- Customize the options as needed; here are my recommendations:
- Placeholder Size:
Small - Quality:
60 - Blur Amount:
5px
- Placeholder Size:
Click Generate LQIP
Right-click the generated image that appears under LQIP (Scaled & Blurred)
Depending on your browser, copy the image link directly (i.e. click Copy Image Link) OR open the image in a new tab (i.e. Open Image in New Tab) and copy the URL in the address bar
Image link MUST be a base64 string that starts with
data:content/type;base64Paste the base64 string (aka image link) in the
lqipfield of the front matter (i.e. use it to replacebase64-encoded-lqip)To verify that the base64 string works, visit Base64 Image Viewer and paste the base64 string in the input field below Base64 Image String
Add Runnable Code Blocks
Add
{: run="<language>" }AFTER the Markdown code snippet of a supported languageLanguage Values JavaScript javascript,jsPython python,pyClick the ▶︎ button in the upper-right corner to run the code snippet in browser
E.g. This Markdown code:
1
2
3
4
5
6
7
```python
def main():
    print("Hello World from Python!")

main()
```
{: run="python" }
Results in this executable Python code block:
1
2
3
4
def main():
    print("Hello World from Python!")

main()
As another example, this Markdown code:
1
2
3
4
5
6
7
8
```js
function main() {
    console.log("Hello World from JavaScript!");
}

main();
```
{: run="js" }
Results in this executable JavaScript code block:
1
2
3
4
5
function main() {
    console.log("Hello World from JavaScript!");
}

main();
Appendix
Workflow
---
title: CI/CD Pipeline
---
graph TD
    Trigger([Push to Main / PR]) --> Checkout[Checkout Code]

    Checkout --> SetupEnv[Setup Pages]

    subgraph Setup Environment
        SetupEnv --> SetupRuby[Setup Ruby]
    end

    subgraph Build
        SetupRuby --> BuildSite[Build Site]
        BuildSite --> GenerateCNAME[Generate CNAME]
        GenerateCNAME --> GenerateNojekyll[Generate .nojekyll]
    end

    GenerateNojekyll --> JoinNode{Successful?}
    JoinNode -- Yes --> UploadArtifact[Upload site artifact]
    JoinNode -- No --> JobFail([Pipeline Failed])
    UploadArtifact --> JobPass([Deploy to GitHub Pages])

    classDef fail fill:#cf222e,stroke:#fff,stroke-width:1px,color:#fff;
    classDef pass fill:green,stroke:#fff,stroke-width:1px,color:#fff;
    class JobFail fail;
    class JobPass pass;
Sync Fork with Upstream
To keep fork up-to-date with original repository (i.e. Chirpy)
Link the upstream (i.e. original) repository to fork
1
 git remote add upstream https://github.com/cotes2020/jekyll-theme-chirpy.git
Use this command if you’ve already linked the upstream repository and want to re-link it
1
git remote set-url upstream https://github.com/cotes2020/jekyll-theme-chirpy.git
- Confirm the remote URL with either command
- Command #1
1
git remote show
- Example Output #1
1
2
origin
upstream
- Command #2
1
git remote -v - Example Output #2
1
2
3
4
origin  https://github.com/lynkos/blog.git (fetch)
origin  https://github.com/lynkos/blog.git (push)
upstream        https://github.com/cotes2020/jekyll-theme-chirpy.git (fetch)
upstream        https://github.com/cotes2020/jekyll-theme-chirpy.git (push)
- Command #1
Fetch latest changes from upstream repository
1
 git fetch upstream master
Switch to
masterbranch (so it’s recognized)1
git checkout master
Switch to the branch you want to sync
1
 git checkout main
Merge changes from upstream into local branch
1
 git merge upstream/main
Push changes to your fork
1
 git push origin main
Contribute Upstream
Continue reading if you want to create a pull request in jekyll-theme-chirpy with only a subset of your commits. This is useful if you want to add a feature to upstream without committing all your changes.
Create Branch
If you haven’t already, complete Step 1 and Step 2 in Sync Fork with Upstream section before continuing.
Manually via GitHub
Go to your GitHub repository (i.e.
https://github.com/USERNAME/REPOSITORY_NAME)- Navigate to your GitHub repository’s branches page (i.e.
https://github.com/USERNAME/REPOSITORY_NAME/branches):- Click
NBranches, whereNis your GitHub repository’s current number of branches - Alternatively, click the button for your default branch, which is main in my case, then click View all branches
- Click
Click New branch
Enter the new branch’s name (i.e.
BRANCH_NAME), then selectcotes2020/jekyll-theme-chirpyrepository andmasterbranch (under Source)Click Create new branch
The branch should now appear on your GitHub repository’s branches page under Your branches and Active branches
Go (i.e.
cd /path/to/REPOSITORY_NAME) to your repository and fetch the newly created branch1
git fetch origin BRANCH_NAME
To fetch ALL remote branches:
1
git fetch origin
Switch to your branch
1
 git checkout -b BRANCH_NAME
Make your changes, then stage, commit, and push them
1
2
 git commit -am "COMMIT_MESSAGE"
 git push origin BRANCH_NAME
Refer to Commit Message Conventions section for commit message guidelines
Go to the originally forked repository, i.e.
jekyll-theme-chirpyClick the New pull request button
Complete the pull request template accordingly
- Click the Create pull request button
Cherry Picking Commits
Create a new branch, e.g.
BRANCH_NAME1
git checkout -b BRANCH_NAME upstream/masterCherry pick the commit(s) you want to include in the PR
1
 git cherry-pick COMMIT_HASH
Push your branch
1
 git push origin BRANCH_NAME
If successful, the terminal should output something similar to this:
1
2
3
4
5
6
7
8
9
10
11
12
13
Enumerating objects: 111, done.
Counting objects: 100% (83/83), done.
Delta compression using up to 16 threads
Compressing objects: 100% (50/50), done.
Writing objects: 100% (51/51), 8.50 KiB | 1.70 MiB/s, done.
Total 51 (delta 36), reused 0 (delta 0), pack-reused 0 (from 0)
remote: Resolving deltas: 100% (36/36), completed with 26 local objects.
remote:
remote: Create a pull request for 'BRANCH_NAME' on GitHub by visiting:
remote:      https://github.com/GITHUB_USERNAME/REPOSITORY_NAME/pull/new/BRANCH_NAME
remote:
To https://github.com/GITHUB_USERNAME/REPOSITORY_NAME.git
 * [new branch]      BRANCH_NAME -> BRANCH_NAME
Go to the originally forked repository, i.e.
jekyll-theme-chirpyClick the New pull request button
Complete the pull request template accordingly
Click the Create pull request button
Delete Branch (Optional)
Once you no longer need a branch (e.g. its PR has been approved and merged), you can delete it
- Delete it remotely with one of the following methods
- Via command line
1
git push origin -d BRANCH_NAME - Via GitHub.com
- Go to your GitHub repository’s branches page (i.e.
https://github.com/USERNAME/REPOSITORY_NAME/branches) - Find your branch
- Click the Trash icon on the right-hand side of the branch’s row
- Go to your GitHub repository’s branches page (i.e.
- Via command line
Remove stale references (i.e. pruning)
1
 git fetch -p
To automatically prune after every fetch:
- Command line
1
  git config --global fetch.prune true
- Visual Studio Code
Open Command Palette (shortcut: Command ⌘ + Shift ⇧ + P)
Select Preferences: Open User Settings (JSON) (global settings) OR select Preferences: Open Workspace Settings (JSON) (local settings)
Add the following setting, then save your changes (shortcut: Command ⌘ + S)
1
 "git.allowForcePush": true
- Command line
Delete it locally
1
git branch -D BRANCH_NAME- Confirm it’s successfully been pruned and deleted by making sure it doesn’t appear in the output
- Command
1
git branch
Example Output
1
* main
- Command
Commit Message Conventions
Commit messages should follow this format:
1
2
3
4
5
<type>(<optional scope>): <description>

[optional body]

[optional footer]
| Type | Description |
|---|---|
fix | Change that fixes a bug or error |
feat | Change that adds, adjusts, or removes a feature |
refactor | Change that rewrites or restructures code without altering behavior |
perf | Change that improves performance; subset of refactor |
style | Change that addresses code style (e.g. white-space, formatting, missing semi-colons) without affecting behavior |
test | Change that adds or changes test(s) |
build | Change that affects build system or component(s) (e.g. build tools, external dependencies, project version) |
docs | Change to documentation |
ops | Change that affects operational aspects (e.g. infra, DevOps, backups, monitoring, recovery procedures) |
chore | Change to routine or automated tasks (e.g. dependency update, modifying config files, non-functional tasks) |
release | Change that relates to a new version release |
deprecate | Change that deprecates functionality |
revert | Reverts to a previous commit |
---
title: Commit Message Flowchart
---
flowchart TD
   T[Did you deprecate a feature?]
   T -- Yes --> U[deprecate]
   T -- No --> V[Did you revert to a previous commit?]

   V -- Yes --> W[revert]
   V -- No --> X[Did you create a new release?]

   X -- Yes --> Y[release]
   X -- No --> A[Did you fix a bug?]

   A -- Yes --> B[fix]
   A -- No --> C[Did you change functionality or UI?]

   C -- Yes --> D[feat]
   C -- No --> E[Did you add or change tests?]

   E -- Yes --> F[test]
   E -- No --> G[Did you change code style or formatting?]

   G -- Yes --> H[style]
   G -- No --> I[Did you make changes to documentation?]

   I -- Yes --> J[docs]
   I -- No --> K[Did you change things related to build or deploy operations?]

   K -- Yes --> L[build]
   K -- No --> M[Did you change something related to DevOps, infra, or backups?]

   M -- Yes --> N[ops]
   M -- No --> O[Did you complete a maintenance or non-code task?]

   O -- Yes --> P[chore]
   O -- No --> Q[Did you rewrite or restructure code specifically for performance?]

   Q -- Yes --> R[perf]
   Q -- No --> S[refactor]
Credits
- Tutorial inspired by Alex Oliveira’s blog post Jekyll Blogging with Obsidian
- Preview image taken from
@socra - Full credit for
jekyll-theme-chirpygoes tocotes2020(aka Cotes Chung); for more information: - Commit Message Chart
- Conventional Commit Messages (Gist)
- Conventional Commits
- Angular: Commit Message Guidelines
- Commit Message Guide