Custom Storage
DIY guide on building your own external drive with a WD_BLACK SN850X NVMe SSD (or any NVMe M.2 SSDs with 2280 / 2242 / 2230 form factor) and an OWC Express 1M2 Enclosure.

Note: I started writing this before SSD prices skyrocketed, so I’m aware that some of the following (namely SSDs being an affordable option to adding additional storage to your Mac) may no longer be applicable…
Buying storage for your new MacBook is expensive and can be inconvenient. Customers can’t modify internal storage later, so what you buy is what you get. But what if you wanted an additional, customizable, and portable 4 TB SSD external drive? That’s what this guide seeks to address.


❮
❯


Background
An SSD, short for Solid-State Drive, is a data storage device that uses nonvolatile flash memory (which is composed of integrated circuits). An SSD controller keeps track of where data is stored within the drive, thus allowing you to access your data.
- How it works
- SSDs store data on electronic circuits.
- Read process
- An SSD controller finds the correct address and reads its charges.
- Write process
- An SSD copies data to a new block, then erases the old block. It then writes new to the old block by changing its charges.
- Performance
- SSDs are faster than HDDs. They’re silent and run cooler.
- Cost
- SSDs are costlier than HDDs.
- Durability
- SSDs are electrical, which makes them less prone to damage.
In order to communicate data, SSDs contain floating gate transistors in grid patterns where different charges translate into binary ones and zeroes. Each row in the grid patterns is called a page, while a block – which is where information is stored – is composed of many pages.
This excerpt from TonyMacx861 provides additional context that’s specific to Apple / macOS:
An SSD controller, also referred to as a processor, includes the electronics that bridge the NAND Flash memory components to the SSD input/output interfaces. The controller is an embedded processor that executes firmware-level software. The SSD firmware is device specific, and in most cases can be updated.
Since November 2020, Apple has placed their SSD (NAND flash) Controller on the SoC and kept the NAND Flash separate for security reasons. This makes it nearly impossible to remove the SSD from a stolen M1/M2 Mac and view the data on another Mac. Even if you have the exact same model of Apple Silicon Mac to install it in. The Secure Enclave (also on the SoC) is isolated from the main processor to provide an extra layer of security and is designed to keep sensitive user data secure even when the Application Processor kernel becomes compromised.


There are a bunch of SSDs and enclosures to choose from. How did I narrow it down, and why did I choose the WD_BLACK SN850X and the OWC Express 1M2 Enclosure?
Well, first, I wanted to make sure it was compatible with Mac (since I use a MacBook Pro). It must be customizable and be high performance, so buying a pre-made external drive was out of the question. The OWC Express 1M2 Enclosure was an easy choice since it has a robust heatsink, supports both Mac AND Windows, and (to my knowledge) has a reputation for quality.
Since I’d be using it for game storage, it has to be powerful and made with that purpose in mind. It has to be able to save both Windows AND Mac games from Steam. Of course, I also want to use it for backups and other stuff (i.e. not just gaming). Since I own a lot of games (mostly on Steam), I decided to play it safe and went with 4 TB storage size.
I was torn between the Samsung 990 PRO and WD_BLACK SN850X, but chose the latter after reading about a weird bug with Samsung 990 PRO that only affects Macs1:
Prior to macOS Monterey, Samsung drives worked seemingly without issue. We don’t know what changed in macOS 12 but we do know that Samsung’s proprietary NVMe SSD controllers do not work well with macOS Monterey or Ventura. It doesn’t look like a firmware fix from Samsung is ever going to be released. Here’s a few examples of their drives that will potentially lead to ultra long macOS boot times. Some have reported six to seven minutes.
This is TRIM and APFS related. Disabling TRIM is not recommended… Acasis, who makes Mac compatible NVMe enclosures, warns their customers about using Samsung 970 EVO (Plus) drives with their product. Note that the WD SN570, SN770 and SN850(X) perform the very best of any drives


This has been documented several times, such as with Acidanthera’s research on the Samsung “TRIM Bug” and this thread on tonymacx86.com that shows how write speeds are reduced to extremely slow levels when using a Samsung NVMe with an APFS formatted drive.
There’s also been issues with the Samsung 990 PRO’s reliability across different operating systems (i.e. not just macOS); multiple people have reported a drop of around 1% endurance per week2 and a loss of 10-12% health within a month3.
overclock.net user Midian reported4:
Drive is just 1 month old and already it seems 7% is used up, the TBW is no where near the supposed 1200TBW it’s capable of so what is going on here? … I have tried other programs and they all report the same 93% health. Readings have dropped from 95% to 93% in just a few days with no dramatic increase in TBW.

Reddit user RobbieKhan reported5:
Screenshot:
Got my 990 Pro 2TB to upgrade from a 970 Evo Plus which I’ve had for over a year. The 970 for ref was at 99% health still last week before I disconnected it to clone over from onto the 990 Pro.
The 990 was fine until the other day when I noticed the health reported as 99%, now today I’m seeing 98%, only written an additional few tens of GB to it since that time.
Edit* My drive had dropped to 94% health before I contacted Samsung RMA service.

Twitter user Neil Schofield reported6:
36% worn out after writing less than 2TB of data?
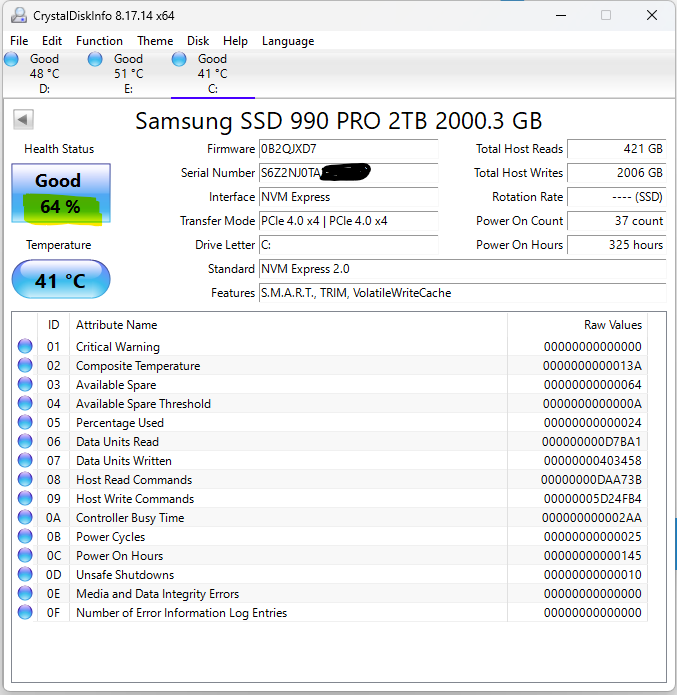
This is unusual because the Samsung 990 Pro 2TB has 1200TBW. If it’s 36% worn out, that implies it already wrote 432TB (0.36 * 1200TB) of data. But this makes no sense since less than 2TB of data was written, meaning it should actually be close to 0.17% (2TB / 1200TB) worn out (i.e. nearly brand new)?
Samsung is aware of this issue and has since released a firmware update7, but this only stops it from degrading further and doesn’t reverse any existing degraded health.
The fact that Apple sources their SSDs from Western Digital/SanDisk also helped me feel sure of my choice.
Requirements
- WD_BLACK SN850X without Heatsink OR any NVMe M.2 SSDs with 2280 / 2242 / 2230 form factor
- 0TB OWC Express 1M2 Enclosure 40Gb/s OR 80Gb/s
- macOS 10.13 or later (for 40Gb/s) OR macOS 10.14 or later (for 80Gb/s)
- Pelican 1040 Micro Case (OPTIONAL)
- USB-C Dust Plug (OPTIONAL)
Setup
Device Assembly
- Place OWC Express 1M2 upside down on a flat static free surface
- Remove the screws by using the included screwdriver

- Slide back then lift away the bottom tray

- Once the enclosure is open, take your NVMe M.2 SSD and carefully slide it inside


If your SSD has a 2242 OR 2230 form factor, you will need a 5mm hex socket to loosen the drive post, then move it to the desired form factor position

- Screw the SSD into the enclosure so it’s secured


- Align the enclosure’s previously removed bottom tray with the top cover so the thermal pad (i.e. yellow and purple strip inside the enclosure) is atop the SSD, slide the pieces together, then gently press down the top cover to ensure they stick

- To make sure it’s properly shut, screw the previously removed screws back inside the enclosure with the screwdriver

- Peel open one of the included rubber foots and press it into the crevice containing the screws

- Using the included 0.3M (12”) USB4 cable, connect it into the OWC Express 1M2 USB4 port and your Mac
If successfully connected, the LED indicator should light up
Format SSD
Make sure to complete ALL the steps in Device Assembly before proceeding
- Open Disk Utility
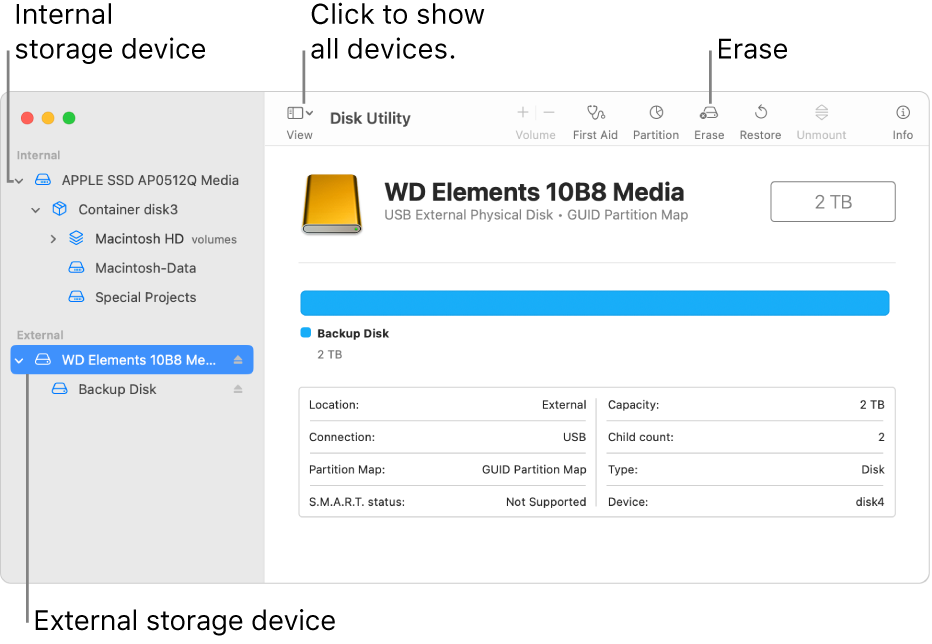
- Click on View, then Show All Devices

- In the sidebar, select your SSD under External; in this example, it’s named “WD_BLACK SN850X 4000GB Media”

- Click the Erase button

- Click the Scheme pop-up menu, then choose GUID Partition Map
- Click the Format pop-up menu, then choose the Apple File System (APFS) format
- Enter a name
- Click Erase, then click Done
Create Volumes
Make sure to complete ALL the steps in Format SSD before proceeding
- Click on your SSD in Disk Utility
- Click on the + symbol above Volume to add a volume

- Enter a name for the volume, then click Size Options... button

- If you plan on having more than 1 volume on your SSD, enter your Reserve Size and/or Quota Size (both values are optional)

- Reserve Size: Ensures that the amount of storage remains available for this volume
- Quota Size: Limits how much storage the volume can allocate
- Click Add, then Done
- Repeat Steps 1 – 5 for each volume you want to create; in my case, I created 2 volumes: 1 for Backups and 1 for Games
- To view your newly created volumes, click on View, then Show Only Volumes
 Games volume setup in Disk Utility
 Backups volume setup in Disk Utility
Setup Volumes
Make sure to complete ALL the steps in Create Volumes before proceeding
Backups: Time Machine
- Open System Settings
- Click General, then Time Machine

- Click the + symbol

- Select the volume you want to use as your backup device, then click Set Up Disk...

- Customize it to your liking, then click Done

- It should now appear as one of the listed backup devices
- Click Options... for further customization, then click Done

Now that it’s setup, you can use your device as backup. If you’re still in the Time Machine settings and want to immediately backup: right-click your backup device, then click Back Up to "<YOUR_DEVICE_NAME>" Now
Anytime you want to create a backup, click the Time Machine icon in your menubar, then click Back Up Now in the dropdown 
Games: Steam
If you’re like me and want to save both Windows (played via WINE) AND Mac games to the SSD, you’ll want to create 2 separate folders in your volume. This is to avoid installation conflicts and other issues.
If this doesn’t apply to you, there’s no need to create 2 separate folders or follow the steps in this section. All you’d need to do is:
- Open Steam
- Navigate to Preferences (or Settings) > Storage
- Click + Add Drive
- Select your drive from the dropdown
If you’re interested in reading more about my WINE setup, check out Play Windows Games.
- Open Finder
- Click on the volume you want to save your games to, then create 2 folders:
WindowsGamesandMacGames
- Open the Mac Steam client, then open Settings (either with ⌘ + , or by clicking Steam > Preferences in the menubar)
- Click Storage

- Navigate to your backup

- Click the ... icon, then click Remove Library

- Quit Steam (either with ⌘ + Q, by clicking Steam > Quit Steam in the menubar, or right-click the Steam icon in the dock and click Quit)
- Reopen Finder and navigate to your drive
- Create a new
steamappsfolder inside BOTHMacGamesANDWindowsGames1 2 3 4 5
. ├── MacGames/ │ └── steamapps └── WindowsGames/ └── steamapps - Relaunch the Mac Steam client, open Settings (either with ⌘ + , or by clicking Steam > Preferences in the menubar), then click Storage
- Click + Add Drive

- Select Let me choose another location from the dropdown, then click Add
- Navigate to your drive, select
MacGames, then click Open
- Quit Steam (either with ⌘ + Q, by clicking Steam > Quit Steam in the menubar, or right-click the Steam icon in the dock and click Quit)
- Open your Windows Steam client (e.g. via CrossOver, your own WINE setup, etc.)
- Click Steam > Settings

- Navigate to Storage, then click + Add Drive
- Select Let me choose another location from the dropdown, then click Add
- Navigate to your drive, select
WindowsGames, then click Open
If everything’s setup properly, you should be able to install games into their respective drives!
Performance
WD_BLACK SN850X
 Speed test performed with Blackmagic Disk Speed Test
OWC Express 1M2
40 Gb/s (original model)
Ideal for use with USB4 40Gb/s and USB-C 10Gb/s Mac and PC computers, iPads, and tablets.8
| Connected To… | Runs As | Up to Real-World Speed |
|---|---|---|
| Mac computers with Apple Silicon M1/M2/M3/M4 | USB4 (40Gb/s) | 3189MB/s |
| USB4 (40Gb/s) port on any PC | USB4 (40Gb/s) | 3836MB/s |
| Thunderbolt 4 port on any PC | USB4 (40Gb/s) | 3836MB/s |
| USB-C (10Gb/s) port on iPad, Mac, or PC | USB4 (10Gb/s) | 990MB/s |
80 Gb/s
Specifically optimized for Thunderbolt 3/4/5 and USB4 80Gb/s computers.9
| Connected To… | Real-World Speed |
|---|---|
| USB4 80Gb/s or Thunderbolt 5 host | Over 6000MB/s |
| USB4 40Gb/s host | Over 3800MB/s |
| Thunderbolt 4 host | Up to 3800MB/s |
| Thunderbolt 3 host (Mac only) | Up to 2800MB/s |
References
Choosing a Compatible NVMe SSD for your macOS Boot Drive ↩︎ ↩︎2
Samsung refusing to acknowledge and replace 990 Pro SSD with rapid health drops [Update] ↩︎
Problem with S.M.A.R.T. health reading on Samsung 990 Pro 2TB SSD ↩︎
Samsung 990 Pro 2TB lost 2% health in the space of a week after 1.8TB writes? (/r/BuildAPC) ↩︎
Samsung 990 Pro SSD firmware update should halt—but not reverse—rapid wear-out ↩︎